InVision Studio: How to Get Started and 5 Prototyping Tips


Prototypes are a valuable part of any product design and development process. From concepting and research to design and development, interactive clickable prototypes can help ensure you’re making the right design decisions along the way. Through collaboration within design tools like InVision Studio, designers can collect feedback from users and key stakeholders on the project by providing them with an interface to interact with, thus speeding up the design process and ensuring your team is building the right thing. All while keeping stakeholders engaged and ensuring users are at the center of the design.
In this post, we’ll share more about InVision, how to create a prototype in InVision, and tips from our own to help you utilize InVision successfully.
What is InVision used for?
InVision is a tool that allows users to turn web and app design mock-ups into interactive prototypes. These prototypes can be used in client meetings to present design ideas in a much more dynamic way—allowing stakeholders, clients or product team members to not only see your design, but to interact with the links and features, too.
Over the years, InVision has become a crucial part of the design process throughout the industry, and we’ve spent a lot of time tweaking and improving the way we use the tool in the course of our UX projects. Here are our top five tips to keep in mind when creating prototypes with InVision.
How to create a prototype in InVision
So, we know prototypes can help improve our product design and development process, but how do we get started? Below are five steps on how to create a prototype in InVision.
1. Create a new prototype
In the main navigation, you’ll click “Documents” and then the plus button and select “Prototype.” This will allow you to name the prototype and select from a list of device types (desktop, iPhone, Android tablet, etc.).
2. Upload your screens
Next, you’ll be prompted to upload your wireframes or screens. You can do this manually or via Craft Sync, which allows you to send your designs from Sketch or Photoshop to InVision easily. You’ll want to manually upload screens if you aren’t using Studio, Sketch, or Photoshop.
3. Sort your screens
Organizing your screens into sections is always helpful. To do this, you can head to the prototype homepage and create dividers between rows of screens. From there, you’ll drag and drop the screens into the associated sections.
4. Add interactivity with hotspots
At the bottom of the page, click the “Build” mode icon to set up your hotspots. Hotspots allow you to link your prototype screens to certain destinations, determine whether clicking or hovering will trigger a hotspot, and adjust scroll settings. Pro tip: creating a “Hotspot link” allows you to make the hotspot once and use it across multiple screens that share common links.
5. Set fixed headers and footers
Adding headers and footers will help provide a realistic experience for those navigating the prototype. At the bottom of your screen, click the “Build” mode icon. This will prompt the ability to check the “Fixed Header” or “Fixed Footer” box at the top right of the page. Once those appear, you can use the slider to adjust the size.
Now that you understand how to build a prototype in InVision check out these five tips from our designers that will help make prototyping even easier—and more successful.
5 InVision Studio prototyping tips
1. Use a clickable sitemap or workflow to help clients navigate the prototype
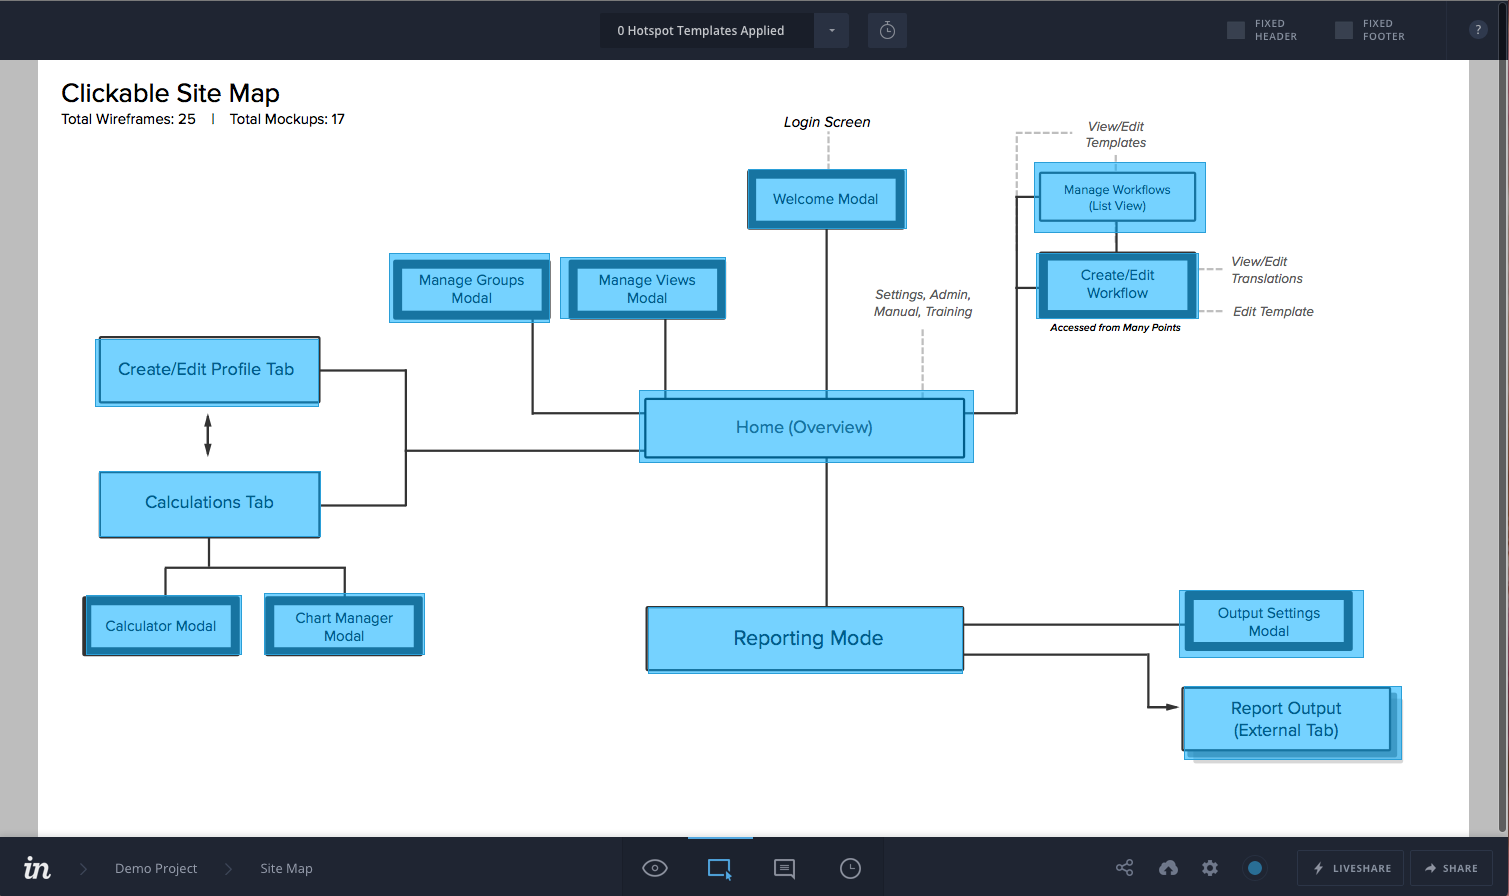
The applications we design and build at Think Company tend to have a lot of moving parts. InVision’s section and navigation features work well for small projects, but it’s easy for clients to lose track of what pages they need to review and how the pages relate to one another as the project becomes more complex. Dedicating one screen at the beginning as a clickable sitemap or workflow makes it easier for clients to keep track of the big picture behind the designs.
InVision sitemaps are also a great spot to include status indicators to mark versions or signal whether something needs review. There is a similar feature built into Workflow, but we find that keeping this information in one spot on the sitemap is easier for stakeholders to remember.
How to build a clickable sitemap using InVision
Step 1: Design a workflow or sitemap in the drawing tool of your choice.
Step 2: Upload all of the corresponding wireframes and mockups for your prototype.
Step 3: Create hotspots on each page title in your sitemap that links to the corresponding wireframe or mockup in the prototype.
2. Establish a naming system for hotspot templates
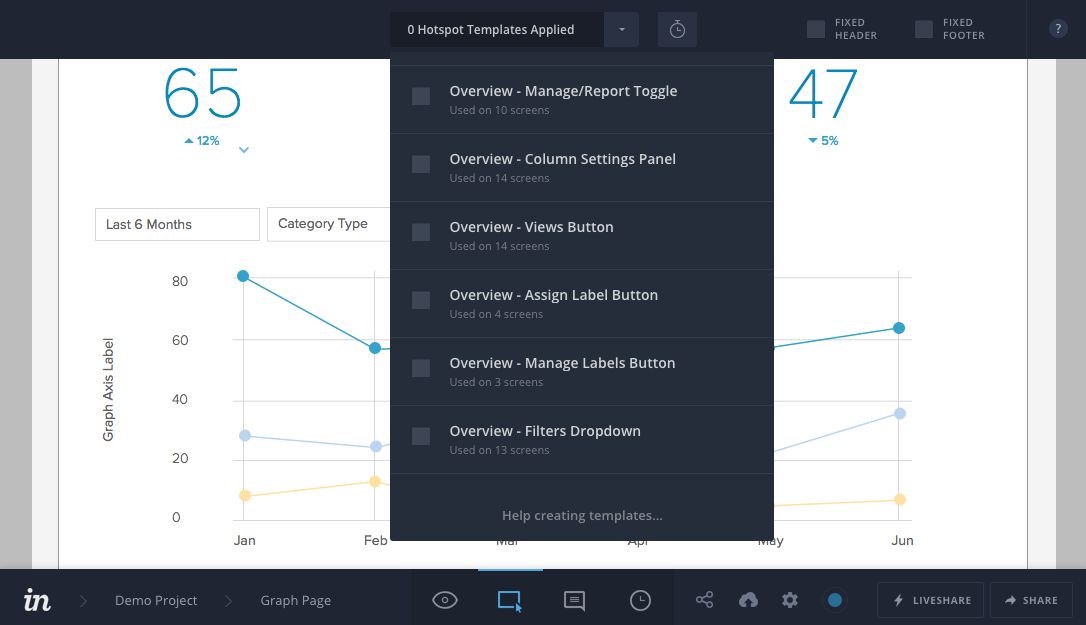
As designers, most of us are pretty familiar with naming our files, pages, and layers in other design tools. It’s a crucial practice for keeping track of the many little pieces of each project.
InVision has Hotspot Templates that allow you to link up multiple screens at a time, saving hours of repetitive work. This is great when most of your elements stay in one spot, but things get messy when they don’t. One or two buttons may need to change position or hide while others are constant.
One workaround for this problem is to make most buttons a separate template instead of grouping them. This strategy gives most of the time-saving goodness of templates, even if more have to be made and managed. The trade-off, however, is that there are tons of little templates all over the prototype.
Setting up a naming system makes it easier to keep track of every template variation. It’s been much easier for the team to go back in and edit or apply them throughout the life of the project. We typically follow the convention:
[Page Name] – [Element Name] – [Element State or Variation if needed]
This system can handle most of your needs since you can easily skim the menu for each template and recall its corresponding hotspots. Now that InVision released the Overlays feature, it’s helpful to apply this system to those as well.
3. Involve clients early and encourage using comments
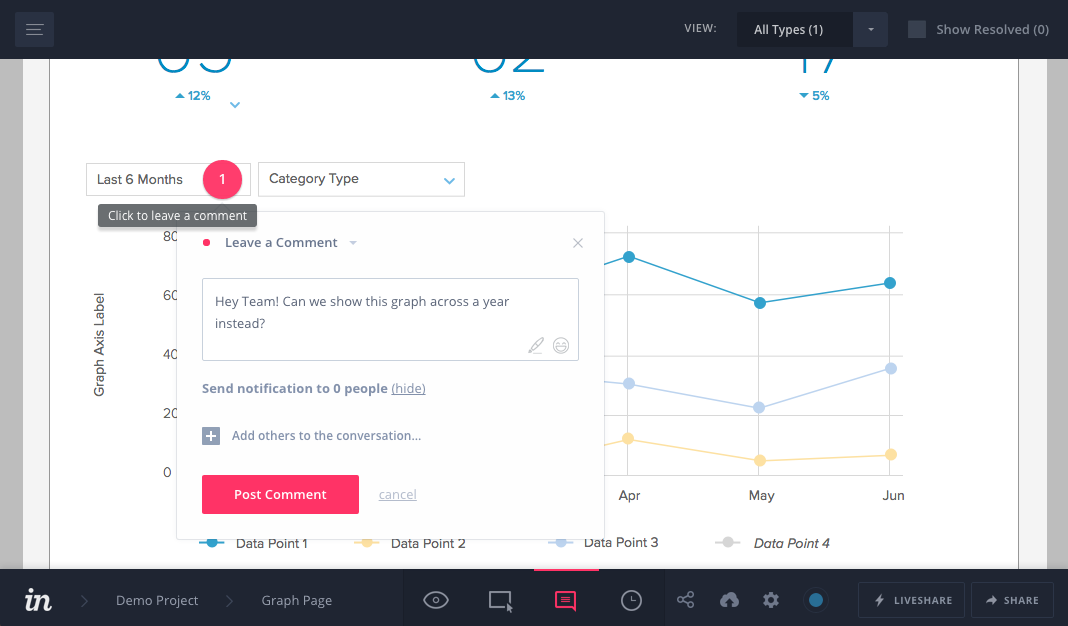
Collaborating with InVision can be a joy when there is a good rapport between the clients and your team. Some clients take to the app quickly and actively give and keep track of feedback through comments without any guidance. Others prefer to give feedback verbally and depend on our team to handle comments. Here are some steps we take to make the most of commenting:
- Establish rounds for feedback and revision. Though few of us at Think Company miss the days of sending and reviewing static PDF documents, one thing it did well was establish clearly documented rounds of feedback. InVision works just fine as a tool for gathering feedback, but to do so it’s important to settle on a pattern with your team and clients early on. The goal is to make it clear to everyone how much work is in scope and what’s expected.
- Write a few comments during meetings in front of the client. If a picture is worth a thousand words, a live demo is worth thousands more. Making note of some specific comments made by the client during a meeting is a great way to acclimate them to using InVision themselves. This works well in remote meetings, too, if you are screen-sharing.
Set clear guidelines on resolving comments. Make sure your team and clients are clear on who handles resolving comments. Decide if you want this to be a way for clients to “sign off” on changes, or if the project manager or design lead will clean up comments when they feel an issue is resolved.
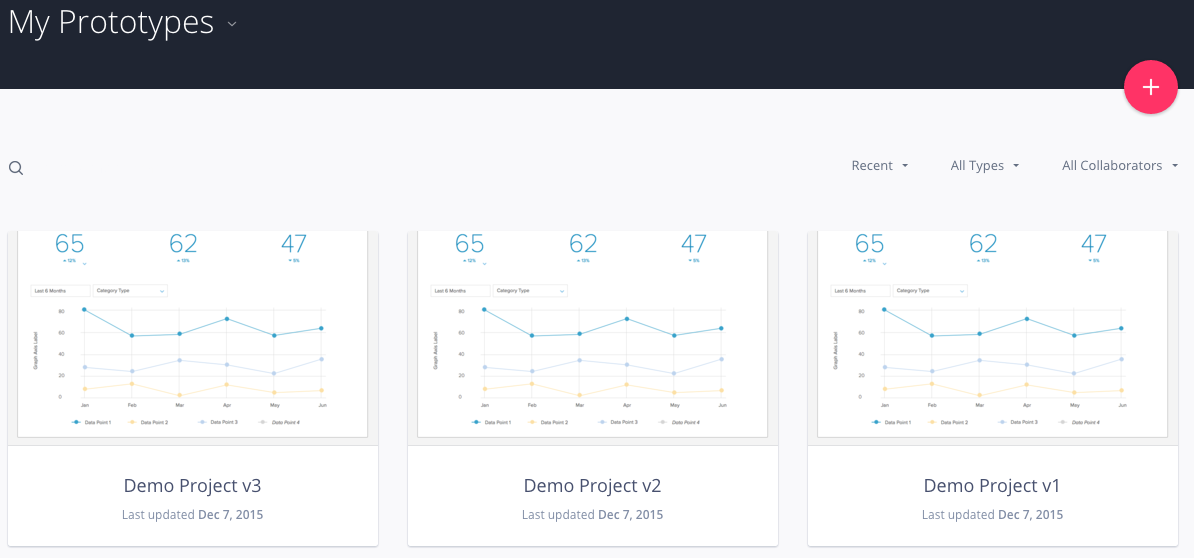
4. Use project folders for versioning
One type of deliverable clients will often ask for is an interactive proof-of-concept. Some of these projects are best served with an html prototype, but we don’t always need that level of fidelity. InVision is a great choice when clients are looking for two things:
- few interactive elements
- the ability to navigate to different pages
Some projects are small enough that we can use sections to distinguish between versions or simply keep wireframes and mock-ups separate. InVision’s History mode is also great for tracking changes to single pages.
However, on projects like these, where the entire prototype becomes the final deliverable, versioning can become a challenge. As a design consultancy, we don’t always have the option to receive rapid feedback from our clients, and we need to set clear boundaries for how many rounds of revision are in scope. The bigger the prototype, the harder it is to manage each round of revision using sections alone. Clients have trouble figuring out which version is current, and designers will struggle with managing multiple versions of hotspot templates or screens.
The simplest way to work around this issue is to copy the prototype’s project folder and give it a higher version number. Since this adds to your project count, this tip requires a Team Edition account or higher. This approach has the added benefit of allowing us to maintain a share link to earlier versions of the prototype.
5. Place overlays precisely using lines or cropped objects as a guide
Our final tip for prototyping in InVision focuses on properly placing Overlays.
The Overlays feature is a huge time-saver when our designs call for a little more interaction via modals, menus, or sidebars. The current version of InVision doesn’t provide smart guides or nudges to help you place an overlay with precision. In all likelihood, this means you will need to reposition your overlays several times to get pixel-perfect precision.
One trick to speed up this process is to include a reference point from the current page as a guide. You can do this via the Slice tool in Sketch, then use an overlay to illustrate two different states of a line graph using the two elements above the chart as a reference point.
Alternatively, Sketch’s Craft plugin can streamline managing prototyping Hotspots between pages, but it can also help make overlaying elements on the same page—like dropdowns and modals—easy and precise as well.
You may be used to creating small artboards at difference sizes for overlaying components—and doing all the positioning within InVision. Instead, keep all your artboards the same width as the “base” page, and position just the overlaying elements in their proper place within their respective artboards. Then, set up the Craft Hotspots to “Link as Overlay” on “Click,” positioned Top Center.
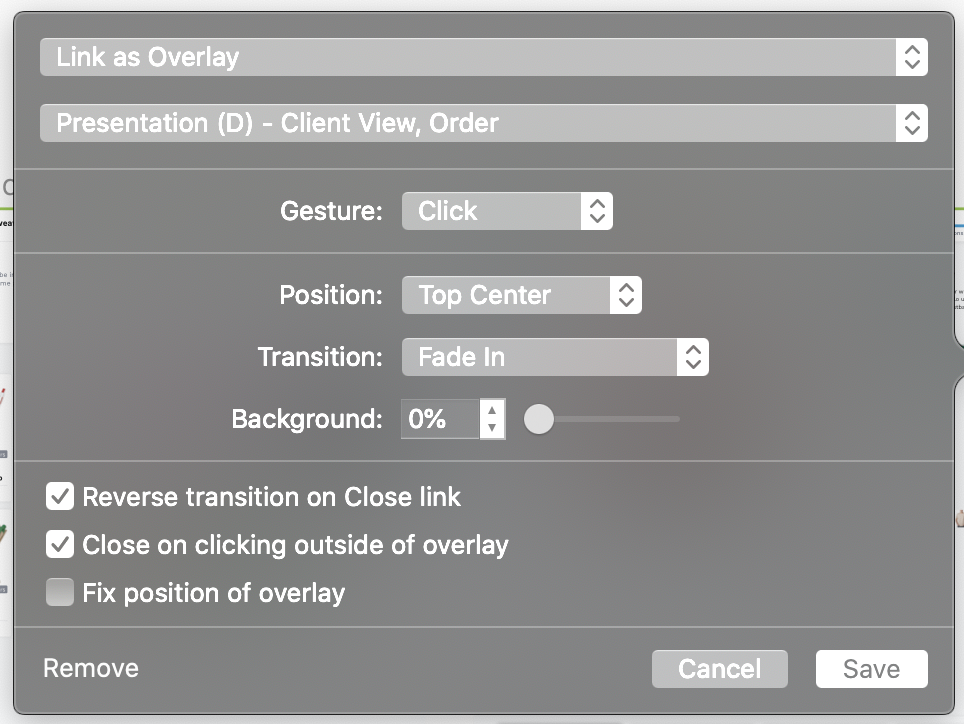
Managing overlays within full-sized Sketch artboards gives you the controls to size and place things pixel-perfect and the use of Hotspots ensures proper placement as the design changes.
Using InVision as a prototyping tool at Think Company
InVision fits nicely into our project work and continues to pump out new features. However, even as our tools evolve, the need to set expectations with clients won’t change anytime soon. For now, these tidbits will help make your next InVision project run a little smoother!
If you’re looking for help creating your next prototype, let’s chat.


Send us a postcard, drop us a line
Interested in working with us?
We scope projects and build teams to meet your organization's unique design and development needs. Tell us about your project today to start the conversation.